Tuesday, 10 May 2011

Thing 13 - The last post

After completing Thing 13
  • You will have reflected on the programme and the different Things
  • You will have...finished! Time to party!
cc Defense Images, Flickr


But first...

Take a moment to look back over the Things, here and in your own blog. Don't forget to check you blogged all 12 of them (and don't forget there's still this one to add)! Our Things have all been about curriculum design, but putting the Things themselves to one side, think also over the programme itself, and how you've engaged and interacted with it.

Blog Thing 13


About the Things:

  1. Which Things, or kinds of Thing, or just ideas, did you find most useful, or thought-provoking? Why those ones in particular?
  2. Which didn't you find useful (at all)?
  3. Are there any Things or ideas you think you will use in future?
  4. Were any useful enough that they'd be worth mentioning to other colleagues, or promoting or offering more widely in the University?
About the programme:
  1. Looking back over the programme, what were the good bits about it for you? Ideas, tools, dialogue, reflection, something else?
  2. What could have made it better?
  3. What do you think of the idea of an informal forum or network, for Cambridge staff interested in teaching and learning ideas? Is there a need? Would it interest you?
  4. If 13 Things were to continue, in some form, what should that form be?

Gather your thoughts together and make your last post.

If you're interested ... Pimp your last blog post!

We'd like to introduce Wordle. Wordle doesn't necessary have to do with curriculum design but it's a fun way to summarise documents or blog posts by showing what words got used most.

A Wordle word cloud of this blog

  1. Go to Wordle and click on "Create".
  2. Paste in the URL of your blog, click submit and watch for the result (this may take a few minutes, especially if you have posted lots). You can restrict the content to a single post if you prefer: just enter the specific URL of that post, rather than the general URL for your blog.
  3. You can play with the display using the toolbar at the top until you are happy with it, but don't navigate away from the page or you will lose it. If this happens, just re-submit the copy.
  4. When you are happy with your word cloud, simply take a screenshot of it, save it as an image format, and upload it to your blog.

Congratulations

You've survived the entire 13Things programme!

To celebrate we're organising a gala prizegiving ceremony with again lots of food, and prizes. All Cam13ers are welcome regardless of whether you've finished. Everyone who has finished qualifies for their Amazon voucher. To give everyone a chance to catch up the gala prizegiving will be a bit later; towards the end of May. We'll get in touch soon to organise when.


Friday, 6 May 2011

Thing 12 - LDSE

LDSE logo
Thing 12 is one of the most complex Things to introduce, but bear with us and hopefully you'll find it repays investigation. 

After completing Thing 12
  • You'll have experimented with using LSDE to design a module or lecture
  • You'll be aware of its underlying aims as a pedagogic design tool
  • You'll have an updated opinion about the usefulness of such tools
What is LDSE?

The Learning Design Support Environment is free-to-use desktop software for lecturers.  It lets you model a module or session in a way that makes it easy to experiment with different approaches.  As you experiment, it automatically generates an analysis similar to Thing 5's Pedagogy Profile which you can use to help you compare different approaches. You can choose to start a design from scratch, from another design, or from someone else's design.  Sharing designs is straightforward - just save the XML-format file and give it to whoever you want to share it with.

The project is funded by the EPSRC and ESRC under their Technology Enhanced Learning programme and has involved computer scientists, educationalists and learning technologists from six HE institutions, including the Oxford team that developed Phoebe (Thing 7).  LDSE has kept the well-received bits of Phoebe and other previous tools, while putting a lot of work into improving usability and developing the conceptual underpinnings.  In a few minutes you'll get to judge for yourself how well it has succeeded.

Two more things are worth pointing out.  One; LDSE is a project not a product - it's still a bit of a prototype.  The team is collecting feedback now, so your blog posts will help them decide how to continue.  Two; the main reason for LDSE existing is to help lecturers take advantage of new technologies.  All the labour-saving design re-use and drag and drop is just a means to this end; it lets the software know something about what you're doing, so it can highlight pedagogic principles which you can apply to decisions about how technology might enhance your teaching.


Learning Design Support Environment from LDSE on Vimeo.

How is it used?

The tool's focus is 'sessions', which might be lectures or seminars, or more extended work like field trips or unsupervised study.  Future versions may add 'modules', assembled from groups of sessions, and 'teaching and learning activities' from which sessions are assembled.

The application window has three parts; a 'files' view in the left-hand column, showing your collection of modules, sessions and learning activities.  The main central pane is where you put together your designs, and the right-hand column is a 'palette' from which you can drag items and drop them into your designs.

The Session Properties tab

When working on a session the central pane has three tabs: properties, timeline and evaluation.  The properties tab contains the title, timing and description of the session, plus its aims and learning objectives, which need to be dragged in from the palette.  Once dragged in, these very generic statements can be edited to make them specific, e.g. "Students can explain surface features in terms of plate tectonics" could be a contextualisation of "Link between theory and practice".

All LDSE's palette items are 'learning patterns' captured from actual teaching, abstracted from their subject-specific content, and made available to the user as a basis for new content. 

Once the properties are complete, users proceed to the 'timeline' view.  The palette changes to offer a range of generic learning activities and assessment types, which once dragged onto the timeline can again be edited to fit the specific circumstances.
The Session Timeline tab
When the activities have been placed, the 'evaluation' tab gives two visualisations of the designed session.  One is the inventory view, the other shows the proportion of time allocated to individually-tailored vs. 'one size fits all' work, with group-based investigation falling between the two.  Both views are informational only - it's up to you to decide what you want more or less of.  The idea is that auto-generating them in this way makes it easy to compare the effects of group size / teaching methods / use of technology on the learning experience / types of learning.
The Session Evaluation tab
Later versions of the software than currently available for download have extra features.  You''ll be able to start a design using a 'pedagogical pattern' with pre-set generic learning objective types and session activities.  The evaluation tab includes costs, in terms of yours and your students' time, to help you weigh costs and benefits of alternative teaching approaches.  It 'knows' how, for instance, a particular kind of learning objective is supported by particular learning activities, or even complete learning designs, and make recommendations to enhance learners' experience.  Each learning activity and evaluation metric comes with ideas and guidance from an updated version of the Phoebe wiki.  The time line can be scaled to work in weeks, days, hours or minutes, whichever makes sense for your session.  It is possible to edit learning activities to take account of the fact, for instance, that your lectures are very interactive and not purely didactic.

Step by step instructions

The downloadable version of the software unfortunately does not include the interesting context-aware guidance features, or the time-saving 'design patterns', so at the moment there's only a limited amount you can do with it.
  1. Download LDSE from the project's downloads page and start the application
  2.  Click 'create a new session'
  3. Try describing one of your seminars or lectures using the palette's aims, learning objective and learning activities, editing them to make them specific to your session as you go.  
  4. Look at the evaluation tab.  Would you like to alter the mix?  Try going back and using some different activity types.  Are you happier with the evaluation breakdown?
Blog Thing 12
  1. Did you find the session design process in LDSE intuitive?  How?  If not, please comment of how it fails to support how you do things usually.
  2. What pedagogic insights did you gain into the session you described in the exercise?  How could these help you design or deliver it differently?
  3. What problems do you have with LDSE as you have seen it? What do you like about it? Would you be interested in seeing the finished software?
If you're interested..
  • The LDSE team is collecting examples of teaching sessions from lecturers, which they are making generic so they can be offered back to LDSE users as 'design patterns.  You can test out the current collection and submit your own using the online Pedagogical Pattern Collector. There's an introductory video on LDSE's Vimeo page.
  • A recent powerpoint about LDSE is available here
  • Diana Laurillard's 'conversational framework' provides the basis of the evaluation tab's inventory view.  The conversational framework is a general description of the process that teachers and learners go through and has amongst other things been quite widely used to compare educational technologies, in terms of what parts of the process they are good at.  For a good introduction read the relevant section here, after which you may the example figure here helpful.
  • Bloom's taxonomy, an influential hierarchy of levels of knowledge, comprehension, and critical thinking in a particular topic, forms the basis of many guides to writing learning outcomes (e.g. this one from Oxford Brookes).  It also provides the majority of LDSE's generic learning outcomes. A good chart of the revised taxonomy, which is harder to find, can be had here.
  • The LDSE team have invested a lot of time equipping the software with a concept map or ontology of learning and teaching, a knowledge base of connected ideas and properties that is supposed to let it infer that if you want to do X you might be interested in considering Y.  The knowledge base itself isn't published, but you can find human-readable overviews of pedagogic models on HEA Fellow James Atherton's site and the Phoebe wiki.   

Wednesday, 4 May 2011

Thing 11 - Open Syllabus

After completing Thing 11
  • You will know what Open Syllabus is all about
  • You will have reflected how it could be useful for you
  • You will have tried applying it to one of your own courses

What is Open Syllabus?

Before we can describe Open Syllabus, it's good to know what a Syllabus is.

First of all...what is a syllabus?
Probably most of you know what a syllabus is, as you probably encounter it regularly. But just to make sure everyone has the same understanding and to rephrase some facts, here's a description.

A syllabus is an outline of topics to be covered in a course. It is often set out by an exam board, or prepared by the professor who supervises or controls the course quality. In Cambridge, it's likely that every department (or even different courses) has another method of constructing a syllabus (often there's a lot of interaction between various parties).
Syllabuses are usually given to students in the beginning of the year so that objectives and the means of obtaining them are clear right from the start. They're also a tool to ensure consistency between subjects as well as to ensure that all parties (e.g. supervisors, lecturers, examiners, students etc) know what must and what shouldn't be taught.
It tries to ensure there is a fair and impartial understanding between instructors and students; setting clear expectations.
Usually a paper version would be distributed to students, but many departments also try to put these syllabuses online (sometimes password protected). This makes it easier for students to compare different courses and so on. Usually departments would try to make the syllabuses for all the courses standardised so they can be used as an easy comparable tool. This would come down to trying to use the same headings for all the syllabuses (aims, objectives, readings/references and so on). Currently, syllabuses are mostly only visible on departmental websites (so not always incorporated in online platforms such as CamTools), and they're most likely to be flat lists (i.e. the list of readings wouldn't link to downloadable documents or library listings or so).

An example of a Cambridge online syllabus


Then what is Open Syllabus?

Open Syllabus is a tool which can be added to your list of tools in Sakai (as you would be adding the 'Files tool' or any other tool into CamTools).
The tool has been developed by HEC Montreal where it has also been incorporated into their Sakai version. CamTools however, doesn't have Open Syllabus in the list of tools yet, but if we see that people think it could be useful, it could be added to the list of available tools at some point.

Open Syllabus could be added as a tool in your CamTools site, and in that way it could solve some problems:
  • If all courses/departments use this tool, the headings and therefore all the syllabuses could be more standardised which makes it a much handier tool for students
  • It means it's enabled in CamTools which makes it handier for students if they're already working in CamTools: they don't have to visit extra websites just to see the syllabus
  • It's easy to immediately link readings/references to documents which are already in your CamTools site.


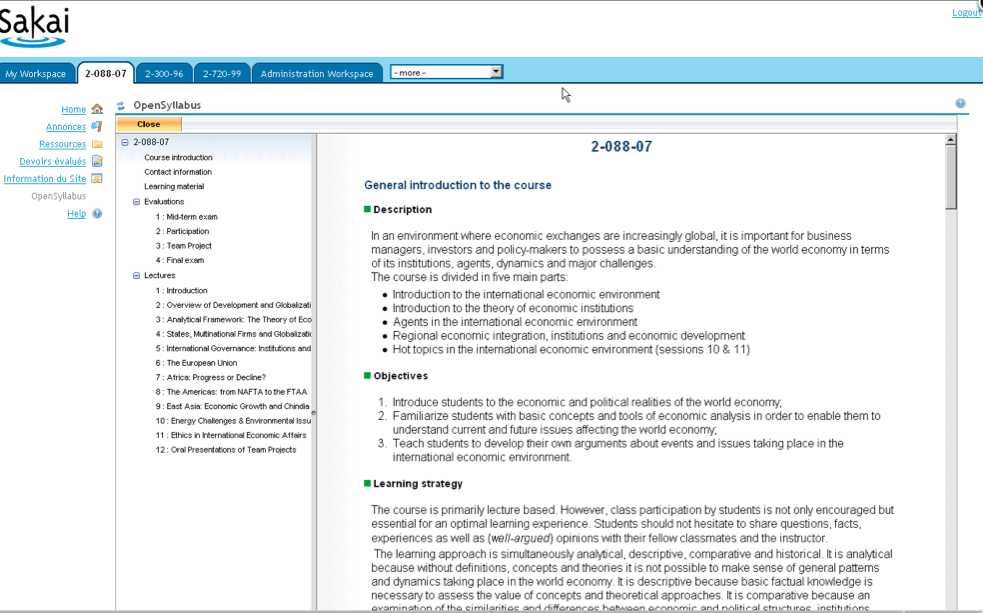
An example of how the Open Syllabus tool could be used


How is it used?

Open Syllabus isn't currently available in CamTools, but if we would get positive responses about it, it could be available at some point. Just as any other tool in CamTools, you would be able to add it to a CamTools site (just like adding the Files tool etc).
As it's not yet available in CamTools, we've set up a test site which you can access by using your Raven account. We've created a site for each of you, trying to simulate the existing sites in CamTools where you're already familiar with (e.g. if you're an admin of a site, we've tried to put some information in these test sites). Don't worry, you're the only one who'll be able to see your specific site so you can try out what you want in it.

As mentioned before, the Open Syllabus tool offers you some kind of template which could be the layout of a syllabus. The headings on the left (e.g. News, Presentation, Contact information and so on) can be changed once it would be running in CamTools. It allows you to add information in each sections, summing up the lectures and allowing you to immediately link to documents or websites. See it as a Wiki in the form of a Syllabus.
You can also enable the 'preview enrolled student version' which lets you see how students see it.


Step by step instructions

We've created a test site for each of you, reusing some of the same headings and information of a CamTools site where you might be familiar with. We've done that so it would imitate the CamTools feeling, allowing you to realise how it could look like in your own CamTools account.
Again, this is just some kind of prototype so some things might change if or might not work perfectly. Let us know your suggestions for improvement too.

  1. Visit the Open Syllabus test environment here
  2. You have to log in twice: First log in with your Raven account (you should be familiar with this process when you explored Thing 9 ), and after that you have to log in a second time in the right corner, again using your Raven account, but this time another password (check the email for Thing 11 for more details).
  3. You'll now land on 'My Workspace'; the landing page for this Open Syllabus test site. You'll see 2 tabs that are important for you: 1) the 'Opensyllabus Example site' which we have populated with OpenSyllabus examples, and 2) Your personal Open Syllabus test site which we have populated with possibly familiar CamTools information and where you can also try out the Open Syllabus tool yourself.
    The second site contains an already populated OpenSyllabus tool (you can just click through to get an idea), and some screenshots of HEC Montreal examples.
    Have a look at the 'Opensyllabus Example site' and read the announcement to get more guidance. Have a look at the clickable example (under the title 'OpenSyllabus'), and the HEC Montreal examples (under the title 'OpenSyllabus Examples') and try to get a general idea.
  4. Now go to the other tab (your own site). Actually the tools on the left side aren't that important; we mostly want you to focus on 'OpenSyllabus'. Click on that and try to use the OpenSyllabus template; populate it with information. It's good to keep a specific course in mind but obviously not all information as we just want you to get the general idea.

Blog Thing 11
  1. What do you think of ideas behind the Open Syllabus tool?
    What was you impression?
  2. In what ways do you see this being useful as a course organiser?
    Would you consider using it if it were available?
  3. Using OpenSyllabus, did you find it illuminating or frustrating?
    Are there any ways you would change it to better reflect what you want to do (e.g. wording/headings...)?
  4. How is your syllabus currently been set up? Is it online? Does it link to downloadable links or is it just a flat list? How do you compare OpenSyllabus with those?

If you're interested...
  • Now try to apply it to one of your own existing syllabuses: look up your online syllabus (or paper version if that's the only version you have), and use those details in the OpenSyllabus tool.